


I tried to have a makeup playdate session with Arienda every two weeks where we can talk about the latest look and do a fun tutorial taping and photograph session. It’s always liberating to get into deep conversation about the things you love with a fellow addict.
Too bad our latest ‘date’ which was scheduled last week was cancelled. But the good this is, this week the office got so many new good stuff. One of them is the Revlon Custom Eyes palette and mascara. Being the addict that we are, we happily dive in and play with the palette right away.

We thought, why waste a good look and we did this tutorial just for you 🙂
Just a quick review on the Revlon Custom Eyes palette first. The one that we have is the Sweet Innocence palette where you can create a sultry purple look with it. The good thing about this palette is that it comes with a chart at the back on where to put the product. It will be a great deal of help for a beginner, I must say.

You get one deep crease colour, one liner colour, two more neutral colours and one highlighter colour. I see that this is the case with other palette in the Custom Eyes series. The neutral colour might not look too pigmented at first, but evidently, as you will see below, they are made to complement each of the other colours within the palette to create a beautiful gradation. Follow the simple step by step tutorial and you’ll get a great sultry purple look.

In this tutorial, we use a mix of sponge tip applicator that you’ll get with the palette and brushes. You’ll need an eyeshadow brush, pencil or smaller eyeshadow brush for the outer corner and crease, blending brush and eyeliner brush.
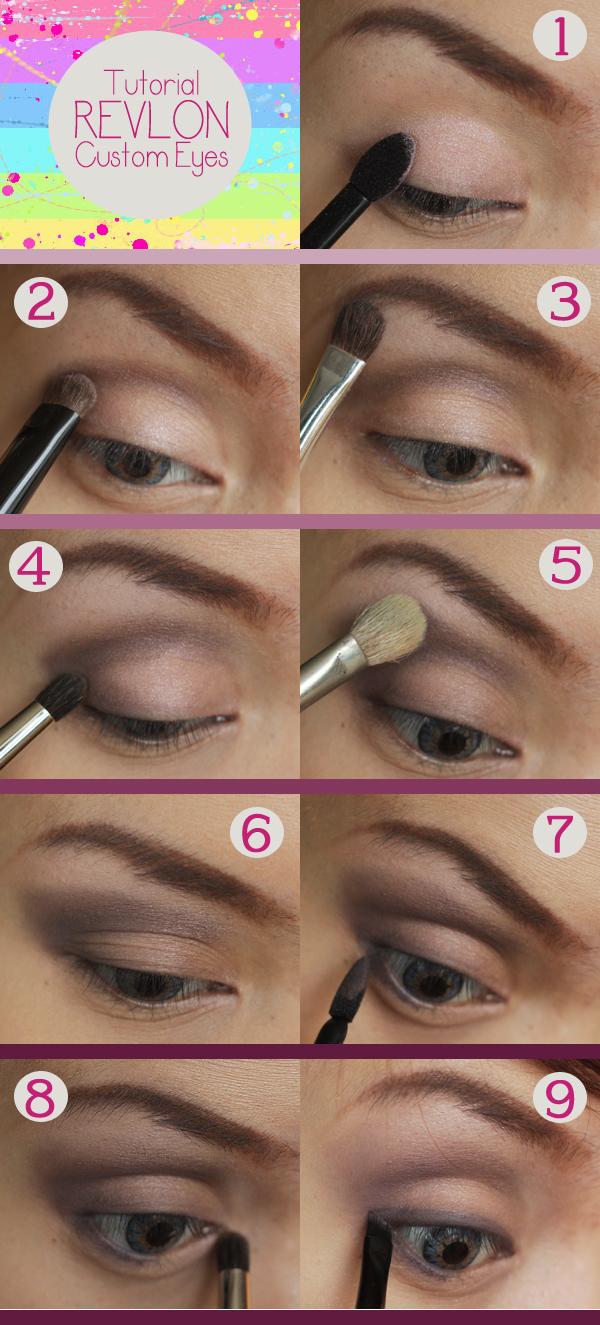
- Apply eyeshadow No 1 all over your lid with dense eyeshadow brush or the sponge tip applicator. Don’t blend it yet, we just want to pile all the colour in the lid.
- Put the deep purple on the crease. Don’t worry that it looks like a line on your lid. We’re going to work with the blending later.
- Dust lightly the bone coloured eyeshadow from the crease line up to your browbone. Be a little bit light handed with this one, because we don’t want this part to appear too whitish.
- Draw a v-like shape on the outer corner of your eyes with pencil or small eyeshadow brush with the brown eyeshadow.
- Now it’s time to blend, blend and blend. Use a blending brush and blend the colour together where you will make the separation of colours disappear. There should be no feasible trace on where one colour starts and one disappears.
- This is roughly what the look should look like after you blend all the colours together. Remember! Be light handed or you’ll make all the colours disappear.
- Line the half part of your lower lid with the chocolate eyeshadow using the pointy sponge tip applicator.
- Use the light peach shadow for the inside corner of your eyes, this will brighten your eyes.
- Here, we use the chocolate eyeshadow as eyeliner. Use an eyeliner brush and damp it a bit before you tap it into your shadow and draw the liner.
To finish off this look simply wiggle the Revlon Custom Eyes mascara from root to end to lengthen and voluminize your lashes. The great thing about this mascara is that it has a very flexible brush. You also got to dials where you can choose between Length & Definition or Length & Drama.

And this is the final look from the Revlon Custom Eyes palette and mascara combination. It’s so easy to do and this purple look can be applied to anyone without having those panda eyes look.

